
UI 기초
0.02
byHAJUNHOSep 27. 2018
1. 폰트 지정
label.font = UIFont.init(name: "NanumSquareOTFL", size: 16)
폰트 이름은
for family in UIFont.familyNames.sorted() {
let names = UIFont.fontNames(forFamilyName: family)
print("Family: \(family) Font names: \(names)")
}
샌프란시스코 폰트 다운로드(sf compact, sf pro)
https://developer.apple.com/fonts/
Fonts - Apple Developer
developer.apple.com
나머진
https://brunch.co.kr/@jade/203
저작권 걱정없는 무료 한글폰트
한글날 기념 무료 한글 글꼴 포함 | 이제 매년 한글날이 되면 많은 기업들이 한글폰트를 내는 것이 좋은 홍보의 수단이 되는 듯 하다. 최근에 누구나 이용할 수 있도록 공개된 무료 한글 공개 폰트(글꼴)들을 정리해 보았다. 유료가 아니어도 예쁜 폰트가 참 많아졌다. 1. 네이버 나눔한글폰트 http://hangeul.naver.com/2016/nanum 가장 많이 사용하는 무료 한글 폰트가 아
brunch.co.kr/@jade/203
2. UINavigationBar
색상 바꾸기
internal extension UIColor {
convenience init(red: Int, green: Int, blue: Int) {
assert(red >= 0 && red <= 255, "Invalid red component")
assert(green >= 0 && green <= 255, "Invalid green component")
assert(blue >= 0 && blue <= 255, "Invalid blue component")
self.init(red: CGFloat(red) / 255.0, green: CGFloat(green) / 255.0, blue: CGFloat(blue) / 255.0, alpha: 1.0)
}
convenience init(rgb: Int) {
self.init(
red: (rgb >> 16) & 0xFF,
green: (rgb >> 8) & 0xFF,
blue: rgb & 0xFF
)
}
}
override func viewDidLoad() {
super.viewDidLoad()
let navigationBarAppearance = UINavigationBar.appearance()
navigationBarAppearance.tintColor = UIColor(rgb:0xffffff)
navigationBarAppearance.barTintColor = UIColor(rgb:0x00aaee)
navigationBarAppearance.backgroundColor = UIColor(rgb:0x00aabb)
}
숨기기
override func viewWillAppear(_ animated:Bool) {
super.viewWillAppear(animated)
UINavigationBar.appearance().isHidden = true
self.navigationController!.isNavigationBarHidden = true
self.navigationController?.navigationBar.isHidden = true
}
override func viewWillDisappear(_ animated: Bool) {
super.viewWillDisappear(animated)
UINavigationBar.appearance().isHidden = false
}
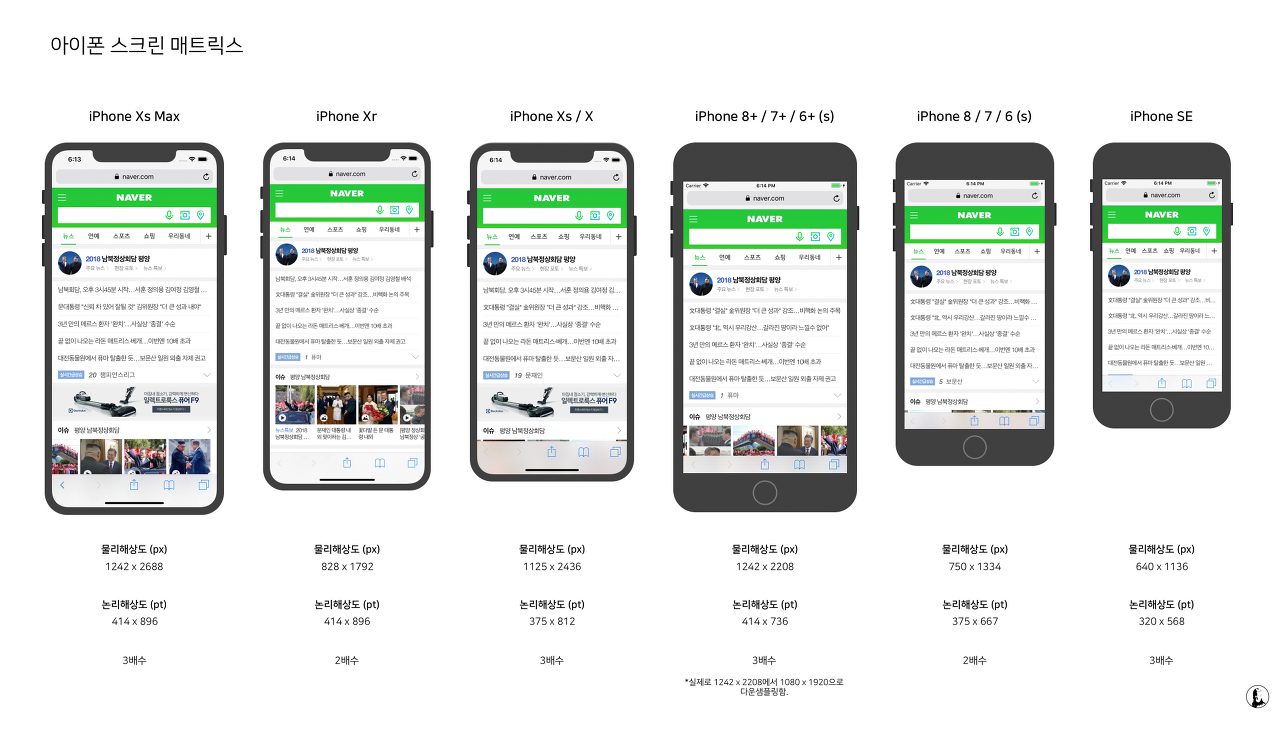
3. iPhone Screen Resolution enum
//Device Native Resolution(Pixels) UIKit Size (Points) Native Scale factor UIKit Scale factor
//iphone XS Max 1125 x 2436 414x896
//iphone XS 1242 x 2688 375 x 812
//iPhone XR 828 x 1792 414x896
//iPhone X 1125 x 2436 375 x 812 3.0 3.0
//iPhone 8 Plus 1080 x 1920 414 x 736 2.608 3.0
//iPhone 8 750 x 1334 375 x 667 2.0 2.0
//iPhone 7 Plus 1080 x 1920 414 x 736 2.608 3.0
//iPhone 6s Plus 1080 x 1920 375 x 667 2.608 3.0
//iPhone 6 Plus 1080 x 1920 375 x 667 2.608 3.0
//iPhone 7 750 x 1334 375 x 667 2.0 2.0
//iPhone 6s 750 x 1334 375 x 667 2.0 2.0
//iPhone 6 750 x 1334 375 x 667 2.0 2.0
//iPhone SE 640 x 1136 320 x 568 2.0 2.0
//iPad Pro 12.9-inch
//(2nd generation) 2048 x 2732 1024 x 1366 2.0 2.0
//iPad Pro 10.5-inch 2224 x 1668 1112 x 834 2.0 2.0
//iPad Pro (12.9) 2048 x 2732 1024 x 1366 2.0 2.0
//iPad Pro (9.7-inch)1536 x 2048 768 x 1024 2.0 2.0
//iPad Air 2 1536 x 2048 768 x 1024 2.0 2.0
//iPad Mini 4 1536 x 2048 768 x 1024 2.0 2.0
extension CGPoint : ExpressibleByStringLiteral {
public init(stringLiteral value: String) {
let point = CGPointFromString(value)
self.init(x: point.x, y: point.y)
}
}
enum iPhoneScreen : CGPoint {
case iPhone_X_XS = "{375, 812}"
case iPhone_XSMax_XR = "{414, 896}"
case iPhone_8Plus = "{414,736}"
case iPhone_8_7_6sPlus_6s_6Plus_6 = "{375,667}"
case iPhone_7_Plus = "{414, 736}"
case iPhone_SE = "{320, 568}"
case iPad_Pro_129 = "{1024, 1366}"
case iPad_Pro_105 = "{1112, 834}"
case iPad_Pro97_iPadAir2_iPadMini4 = "{768, 1024}"
}
쓸 때는 CGPoint 자체를 써도 되고, iPhoneScreen.iPad_Pro_129.rawValue.x 이렇게 써도 된다.
4. AUTOLAYOUT 맛보기
다음은 각 기 다른 회사의 채용 공고에 있는 iOS 개발자 자격 사항이다.
1. Objective-C, Swift, Auto Layout, Storyboard, 객체지향 등의 이해도가 있으신 분
2. swift, objective-c, auto layout
3. Swift , storyboard, auto layout 사용 경험자
Android 개발할 때는 FrameLayout 보다 RealativeLayout를 많이 쓰니 사실상 auto layout이 맞으나, 결국 아이콘은 xhdpi, xxhdpi, xxxhdpi 뿐 아니라, sw600dp, sw720dp 등 기억나는 것만 10개 이상의 layout 폴더에 각기 다른 pixel의 아이콘을 넣었었다. 그리고 기종을 체크해서 코드로 레이아웃을 다르게 구현했었다. 왕도는 없더라. 그래야 깨끗하게 나오니까. 삼성폰의 번들 아이콘이기도 했으나...
스타트업이나 중소기업을 보면 Andorid 보다 iOS로 시작하는 경우가 많다. 7~8년 전 내가 알던 안드로이드 폰 종류가 7000천 가지였는데 지금은 만가 지도 더 될 것 같다. 그래서 트러블 슈팅에서 오는 비용을 줄이기 위해 screen density가 단순한 iOS 먼저 개발하고 성공하면 Android를 하는 경우가 많았다. 같이 개발하더라도 Auto layout를 선호한다.
Android에서 autolayout 이 relative 스타일이라면, iOS는 constratins라 하겠다.
Constraints를 제대로 알려면
https://developer.apple.com/documentation/uikit/nslayoutconstraint
NSLayoutConstraint - UIKit | Apple Developer Documentation
developer.apple.com
부터 보면 되겠지만
좀 더 쉽게 접근하려면 UITableView를 만들고 그 Cell을 코드로 구현하면 된다.
기초는 여기...
https://www.ioscreator.com/tutorials/prototype-cells-table-view-ios-tutorial-ios10
Prototype Cells in Table View iOS Tutorial
When using Table Views inside the Storyboard, prototype cells can be used to create some predefined or even custom layouts of the Table View Cells. In this tutorial we will create a basic Prototype cell, which includes an (optional) image and a title. This
www.ioscreator.com
트러블 슈팅 팁.
unable to dequeue a cell with identifier
스토리 보드에서 Table View Cell의 Identifier 설정이 맞지 않는 경우.
let cell = tableView.dequeueReusableCell(withIdentifier: "여기", for: indexPath)
여기와 Identifier가 일치해야 한다.
굳이 cell을 붙이지 않더라도 TableView만 붙인 상태에서 테스트해 볼 수 있으니,
let cell: UITableViewCell = UITableViewCell(style:UITableViewCellStyle.subtitle, reuseIdentifier: "Cell")
이 코드로 테이블 뷰가 잘 보이는지 확인할 수 있다.
Could not cast value of type 'UITableViewCell'
self.tableView.register(CustomTableViewCell.self, forCellReuseIdentifier: "여기")
즉, Constraints 만드는 방법은 2가지
contentView.addConstraint(NSLayoutConstraint(item: value, attribute: NSLayoutAttribute.centerY, relatedBy: NSLayoutRelation.equal, toItem: self.contentView, attribute: NSLayoutAttribute.centerY, multiplier: 1, constant: 0))
contentView.addConstraints(NSLayoutConstraint.constraints(withVisualFormat: "H:|-[title]-[value]-|", options: [], metrics: nil, views: viewsDict))
다양한 옵션은
https://stackoverflow.com/questions/25413239/custom-uitableviewcell-programmatically-using-swift
Custom UITableViewCell programmatically using Swift
Hey all I am trying to create a custom UITableViewCell, but I see nothing on the simulator. Can you help me please. I can see the label only if I var labUserName = UILabel(frame: CGRectMake(0.0, 0...
stackoverflow.com
를 참고하고 xcode의 autofix 기능을 이용하면 최신 코드로 변경이 가능하다.
맛을 봤다면, 이제 스냅킷을 쓰자.
https://github.com/SnapKit/SnapKit
SnapKit/SnapKit
A Swift Autolayout DSL for iOS & OS X. Contribute to SnapKit/SnapKit development by creating an account on GitHub.
github.com
'살며 생각하며,' 카테고리의 다른 글
| 146 (0) | 2020.04.06 |
|---|---|
| 145 (0) | 2020.04.06 |
| 143 (0) | 2020.04.06 |
| 142 (0) | 2020.04.06 |
| 141 (0) | 2020.04.06 |


최근댓글